How to Wax a Car by Hand


Your car just came out of the wash looking fresh, but something’s missing. Water doesn’t bead off, the paint looks flat instead of glossy, and that deep shine is gone. That’s what wax gives back.
Hand waxing takes about 2–3 hours and $15–80 in materials, and gets you 3–6 months of protection at roughly a quarter the cost of professional ceramic coating.
You don’t need expensive equipment a few microfiber pads, a decent wax, and some patience are all it takes. If your car needs a wash first, our guide to washing a car at home covers the two-bucket method and drying technique.
- Rushing buffing by just 2-3 minutes ruins the finish, so wait 5-15 minutes depending on wax type.
- Over-apply and you’ll get white residue and hazing a quarter-sized amount per section is plenty.
- Clay bar indoors in a closed garage doing it outside just re-contaminates the surface you’re prepping.
- Use linear strokes, not circles circular motions leave swirl marks, and going cross-hatch keeps coverage even.
- Spray water on the hood monthly once it stops beading, protection’s fading and it’s time to rewax.
Choosing the Right Wax Type
Three main wax types work for hand application, each with different durability and ease levels. Your choice depends on climate, budget, and how much shine you want.
| Wax Type | Durability | Cost |
|---|---|---|
| Carnauba Brazilian | 3-4 months | $15-30 |
| Synthetic | 4-6 months | $20-40 |
| Ceramic | 6-12+ months | $30-80 |
Carnauba Wax
Gives the deepest, warmest shine of the three it’s what most detailers reach for on show cars.
It’s also the softest and shortest-lived, so if you’re in a wet or salty climate, you’ll be reapplying often. Lasts 3–4 months, costs $15–30, and is the easiest to apply by hand forgiving for beginners.
Synthetic Wax
Trades some of that warm glow for a more uniform, glossy finish and roughly double the lifespan 4 to 6 months for $20–40.
It bonds more evenly and is less sensitive to temperature during application, making it a solid middle ground if you don’t want to wax every month but aren’t ready for ceramic.
Ceramic Wax
Not the same as a professional ceramic coating, but close. Lasts the longest 6 to 12+ months and handles winter salt exposure best, though it runs $30–80.
It’s also the least forgiving: uneven application shows up as streaking. Best suited if you’re prioritizing protection over shine and don’t mind a steeper learning curve.
If you’re unsure, synthetic is the safest starting point forgiving to apply, and it holds up through most of a winter without needing a second coat.

Set Up Ideal Waxing Conditions
Temperature and humidity control whether wax cures evenly or creates problems. Getting this right prevents hazing, white residue, and buffing difficulties.
Temperature and Humidity
The sweet spot is 60–85°F with humidity below 50%. Below 60°F, wax cures slowly 15 to 20+ minutes and turns rock-hard before you can buff it out. Above 85°F, it’s the opposite problem the wax sets too fast, fights you during buffing, and often hazes.
Humidity above 70% traps moisture under the wax layer, which is what causes that dull, white residue look.
Skip rainy days entirely, and check the forecast before you commit you don’t want humidity spiking halfway through. Spring 60–75°F and fall 65–80°F are usually your easiest windows.
Shade and Ventilation
Work in a garage or shaded spot. Direct sun cures the wax unevenly and makes buffing noticeably harder. Close the garage door to keep dust out, but crack a window fumes build up fast in a sealed space.
Early morning or late afternoon beats midday temperatures are more stable and humidity hasn’t climbed yet.
Gather the Right Application Tools
Cheap applicator pads and towels are where most beginner jobs go wrong uneven pressure, swirl marks, and streaking that forces a re-wax.
Applicator Pads
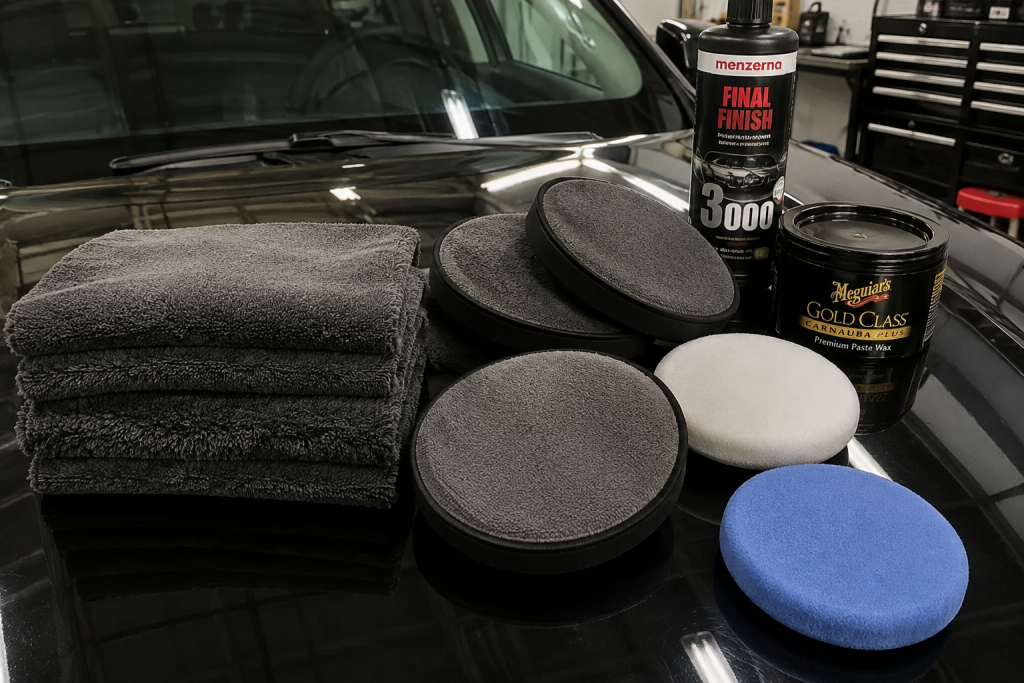
Microfiber pads aren’t optional. They hold product evenly, cut down on streaking, and waste less wax than foam, which sheds fibers and applies unevenly. Buy 2–3 so you’ve got a backup once one gets saturated.
Buffing Towels
Aim for 600+ GSM microfiber towels they give you better control and don’t shed lint. Anything under 400 GSM tends to streak and forces multiple passes over the same panel.
Grab 3–4 so you can rotate as they load up with product.
Autogeek microfiber towels are a solid, beginner-safe pick if you’re not sure where to start.
Optional Helpful Items
A foam applicator holder keeps your hands clean. A product container cuts down on waste. And set a phone timer for the wax’s specific cure time it’s easy to lose track and either buff too early or let it hard-cake.
Apply Wax Section by Section
Work in small, manageable areas 2 to 3 square feet at a time. Go bigger than that and the wax starts curing before you’ve even finished spreading it, forcing you to fight dried product with a buffing towel.
- Roof takes 5–10 minutes it is largest flat surface, gravity helps spread the product, zero re-touching risk. Easiest place to get comfortable before vertical panels.
- Hood is the second-largest flat surface, locks in the linear pattern technique. It takes 5-10 mintues.
- Doors is vertical panels need slightly different pressure. Do each door separately .It takes 10-15 minutes.
- Sides and quarter panels is vertical orientation, so break into smaller sections.
- Trunk usually the fastest; by now the technique should feel automatic.

Application Technique
A quarter-sized amount per section is plenty. More than that just means white residue, hazing, and wasted wax.
Let light to moderate pressure and the product itself do the work pressing harder doesn’t spread it better, it just tires your arm out.
Stick to linear or cross-hatch strokes horizontal first, then vertical over the same spot.
Circular motions leave swirl marks no matter how good your pad is. Overlap each new section by about half an inch so you don’t leave gaps but don’t go back over a section that’s already cured.
Mistakes That Ruin Finishes
- Over-application causes white residue and hazing, so use the quarter-sized amount rule strictly.
- Buffing too early breaks the protective layer before it hardens, so set a timer for the product-specific cure time.
- Circular motions create swirl marks visible in sunlight, so use a linear or cross-hatch pattern exclusively.
- A dirty surface prevents wax adhesion, so clay bar prep indoors before application is mandatory.
- Inconsistent pressure causes uneven coverage and swirls, so use light, steady pressure and let the microfiber pad do the work.
Master Curing & Buffing Technique
The wax isn’t done working the moment you wipe it on it needs time to set before you touch it again. Rush this part and you’ll undo everything you just did.
Cure Time by Wax Type
Paste carnauba needs 10–15 minutes, synthetic needs 7–10, and ceramic needs 5–8. Check your product label for the exact number rushing this by even 2–3 minutes causes hazing or streaking.
Temperature, humidity, and how thick you applied it all shift these numbers. Cold weather slows curing by 30–50%. High humidity extends it further.
The Touch Test
Touch the waxed section lightly with one finger it should feel tacky, not wet. Still wet? Wait 2–3 more minutes. Feels rock-hard with zero tackiness. You’ve waited too long, which usually only happens in hot conditions.
Buffing Pressure and Pattern
Light to moderate pressure, high-density microfiber towel. Unlike application, buffing is forgiving on direction linear or circular both work fine here, since swirl marks come from applying in circles, not removing wax in circles. Overlap your passes slightly so nothing gets missed.
Fold the towel into quarters and work one section until it starts loading up with product, then flip to a clean face. Rotate towels often a saturated towel just pushes wax around instead of buffing it off.
Why Rushing Buffing Ruins the Finish
Wax hardens during cure time into a thin protective layer. Buff too early and you break that layer before it’s set, which shows up as haze, an uneven dull patch, and weaker protection where you rushed it.
Carnauba is the least forgiving buff it at 5 minutes instead of the full 10–15 and you’ll get white residue every time. If that happens, don’t panic apply a thin layer over just that section, wait the full cure time again, and buff gently.
Maintain Protection and Rewaxing
Wax doesn’t last forever, and guessing when to redo it usually means you either waste product reapplying too soon or leave paint exposed too long. Here’s how to time it right.
Reapplication Frequency
Rewax every 3–6 months, depending on how often you wash. Weekly washing strips wax faster reapply around the 3-month mark.
Bi-weekly stretches to 4–5 months, and monthly washing can go 5–6 months before you need a fresh coat. Harsh detergents speed this up too, no matter your wash frequency.
For more on how washing frequency affects protection overall, our guide on how often you should wash your car covers the seasonal math.
Stick to pH-balanced car wash soap, and skip automatic car washes the brushes wear down the wax layer fast. Parking under trees or in direct sun also shortens how long your wax holds up.
Extending Wax Life
A second coat applied 24 hours after the first can stretch protection out to 6–8 months instead of the usual 3–6.
It’s a small extra step with a real payoff if you don’t want to be rewaxing every season. For winter-specific protection advice, our guide to washing a car in winter covers how to protect your wax layer through salt season.
If you’re just starting out or watching your budget, hand waxing is the easiest entry point. Machine polishing makes sense once you want longer-lasting results and don’t mind the extra time.
Ceramic coating only pays off if you’re keeping the car 5+ years otherwise you’re paying for protection you won’t use up.
Whichever you choose, the real work is consistency a $20 wax applied every few months beats a $2000 coating that never gets maintained.